Overview
To publish the services of Lync Server for Internet users need to configure two separate server roles, the Edge and Reverse Proxy Serve. In this article I show the steps for configuring the Forefront Threat Management Gateway 2010 as Reverse Proxy publishing Web Services Front End
For configuration I have a Domain controller and a Lync Server Front End servers are configured with the following IP addresses:
Role
|
Server Name
|
IP
|
| Domain Controller | hm01.home.intranet | 192.168.1.200 |
| Front End | hm02.home.intranet | 192.168.1.201 |
| TMG 2010 | hm06.home.intranet | Internal Network: 192.168.1.205 External Network: xxx.xxx. 235.40 |
With the Reverse Proxy web publishing services Lync Server the following services are available to remote users
- Download meeting content
- Expansion distribution group
- Download Address Book Service
- Provides Lync Web App Client
- Conference Dial-in web page
- Access to Location Information Service
- Connection to the update service devices
- Mobility Services
- Lync Server Internal Web Site: configured on ports 80 and 443, responsible for providing services to internal customers
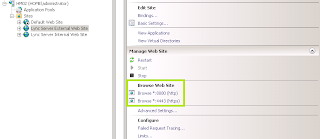
- Lync Server External Web: configured on ports 8080 and 4443, a site that should be published by the Reverse Proxy
TMG's role in this scenario is to direct Internet traffic from ports 80/HTTP and 443/HTTPS to 8080/HTTP and 4443/HTTPS in Lync Server Front End
URL configuration
For the publication of the Web service will use three different url's set in the Front End
Two Url's are configured by default during installation of the Front End, addresses and meet.home.com.br dialin.home.com.br. To check this setting run the Topology Builder and click Lync Server 2010
The third URL must be configured in the properties of the Front End pool. Open the properties of the Front End, Web Services set the url of the External Web Services
No external DNS hosts were created by solving all of these URLs to the ip of external network interface of the TMG.
Host
|
IP
|
| LyncPortal.home.com.br | xxx.xxx. 235.40 |
| dialin.home.com.br | xxx.xxx. 235.40 |
| meet.home.com.br | xxx.xxx. 235.40 |
| LyncDiscover.home.com.br (new URL for Mobility Service) | xxx.xxx. 235.40 |
For more information on configuring the Mobility Service to access the article Configuring Lync Server 2010 Mobility Service
Configuring the Digital Certificate
For publication, you must configure a certificate server in TMG container, this will be associated to https port in TMG. The certificate was issued by the same certificate that was used in the certificates of the Front End
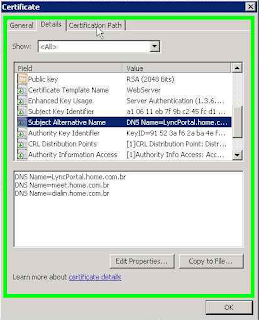
The certificate must be configured with the Common Name to FQDN configured in the External Web Services, this scenario LyncPortal.home.com.br. The SAN certificate must be configured with all the URLs created in the Front End
For the new service to external URL Mobility Service Discovery Service should be added to the SAN certificate, the URL LyncDiscover. <domain Sip> should be added. The figure below shows the configuration of the certificate:
 |  |
Publishing Rule
With the certificate start the TMG management console, right-click on Firewall Policy, select New , and start the wizard Web Site Publishing Rule ...
Set the name of the publishing rule
Create a rule to Allow
In the Publish Type select Publish a single Web site or load balancer.
In the Server Connection Security select the option Use SSL to connect to the published Web Server or Server Farm
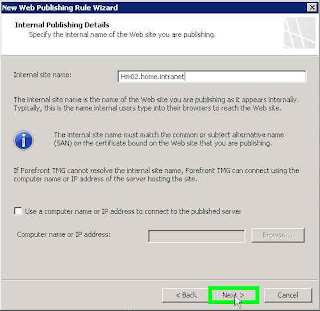
Configure Internal Publishing detais and configure the Internal site name: the FQDN of your Front End server Verify that the TMG is able to correctly resolve the FQDN and successfully ping the server Front End
In Internal Publish Details and set the Path / *
In the Public Name Details select the This domain name (type bellow), set the Public Name LyncPortal.home.com.br, which was set to the URL External Site.
In the Web Listener create a new listener
Set a name for the new listener
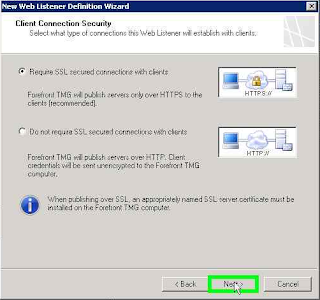
In the Client Connection Security select Require SSL secured connections with clients
In the Web Listener IP Address select the network External , and then click Select IP Address
Select the URL set to ip in DNS
Configured with the IP advance.
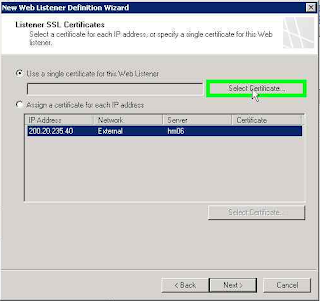
In the Listener SSL Certificate select Use single certificate for the Web Listener and click Select Certificate ...
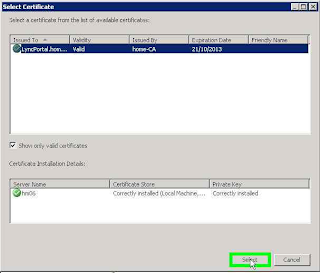
Select the certificate configured with the URL's Lync Server
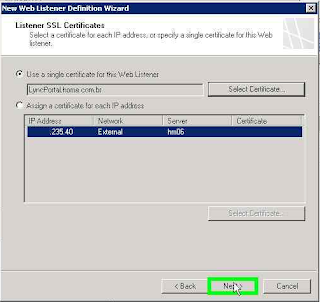
Proceed with the configured certificate.
In Authentication Settings option set No Authentication.
In Single Sign On Settings do not change any setting and advance
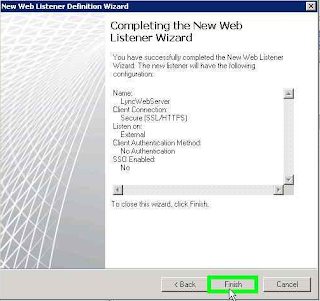
Finalize the creation of the Web Listener
Go in creating the rule
In Authentication Delegation select No delegation, but client may authenticate directly
Do not change the security settings of the rule.
Complete the setup wizard.
Return to the management console and open the rule properties
Tab To check the Forward the original host header instead of the current one
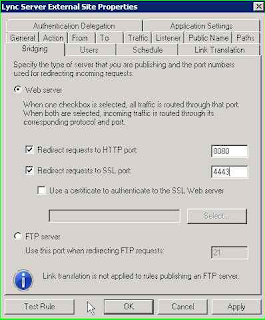
Tab Binding set the Redirect requests to HTTP port: 8080; Redirect requests to HTTP port: 4443
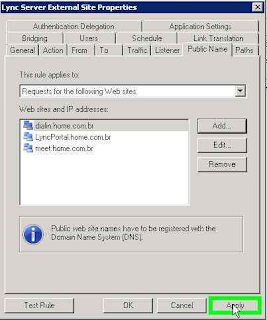
Tab Public Name add the URL's configured. Also add the URL of the Discover Service: LyncDiscover.home.com.br
Test Your Configuration
To test the settings, access the URL's
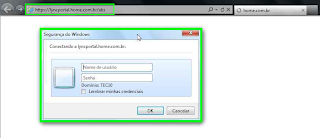
- https://ExternalWebServices/abs, this is the folder from the Address Book Server. The page should require username and password. If you get another result of publication review your configuration
- https://ExternalWebServices/meet, this is the meeting page, it should show code for troubleshooting
- https://ExternalWebServices/ GroupExpansion / service.svc, this is the folder to expand groups. On page must ask for authentication.
- https://DialIn.dominio.com.br, this is the page Dialin,












No comments:
Post a Comment